
Injuries to the Anterior Cruciate Ligament (ACL) are some of the most common injuries in the active population. As incidence of other injuries have decreased, injuries involving the ACL have rose astronomically over the years. There have been numerous studies done looking at what causes the ACL to tear. More specifically, female athletes are 4-5x more likely to tear their ACL as compared to their male counterparts.
Like with any injury, it cannot be blamed on one thing. Injuries are multi-factorial as well as non-preventable. Injuries will always happen. The only thing that we can do is to decrease the frequency or incidence of them. Luckily, as we continue to learn more about the mechanism of injury, we have developed some strategies to reduce your chance of ACL injuries.
5 Ways to Decrease the Risk for an ACL Injury
Here are 5 things to focus on when designing programs to reduce ACL injuries.
Optimize Mobility
If you look at the human body, there are many joints. Some of those joints require mobility and some of those joints require stability. Depending on which plane of motion you are in, mobility or stability is usually more imperative than the other.
When it comes to mobility, there are certain joints in the body that we need to have optimal mobility in order to decrease the risk for an injury to the ACL. The two joints that come to mind are the talocrural joint of the ankle, and the femoroacetabular joint of the hip.
For the ankle, specifically dorsiflexion range of motion is imperative to decrease strain at the knee. If the ankle doesn’t have the ability to dorsiflex and absorb force during a land from a jump or cutting maneuver, the mid foot or knee are the two joints that will have to have increased mobility to accommodate the athletic endeavor.
Ankle Mobility
To assess for adequate ankle mobility, use the Knee to Wall Ankle Mobility Test.
Key Points:
- Place your foot 4 inches away.
- Keeping your foot flat on the floor, attempt to touch your knee to the wall.
- Don’t allow for valgus or varus collapse.
If you can reach the wall from 4 inches, then you have sufficient ankle mobility to run, squat, and perform without playing increased stress through the knee due to poor ankle mobility.
The other joint in the body that needs to have optimal mobility is the hip. The motions at the hip that need adequate mobility are hip flexion, hip extension, hip abduction, hip internal and external rotation.
Now, you may be saying, “Wow, that’s a lot of areas that need mobility.” Well, let’s break it down!
Hip Flexion
 Anecdotally, I like to see clients present with full hip flexion. If there is decreased mobility into hip flexion, this can send a signal to the brain to alter movement and muscle firing patterns and in turn, can affect how someone lands or moves.
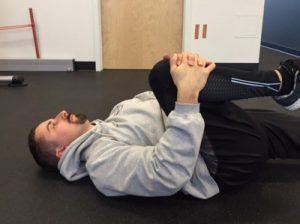
A quick and easy test is to test passive hip flexion range of motion.
This involves bringing your knee towards your chest. Ideally, your thigh should reach the inferior aspect of your rib cage. Now, everyone is made differently and depending upon what sport you play, hip structure can vary from person to person.
If you cannot reach your thigh to your rib cage, slightly abduct your thigh and see if you can go further. If you can, then your hips are structured a little differently.
Hip Extension
Key Points:
- Thigh should be able to reach parallel to ground.
- Knee should be at 90 degrees to thigh.
- Thigh should drop straight down and not flare out towards side of body.
Hip extension mobility is necessary to be able to activate the gluteus maximus and hamstrings in order to decrease incidence of a valgus collapse. If adequate hip extension mobility is not present, then muscular compensation will occur and in turn, possible injury.
Hip Internal Rotation (IR)
Even though hip internal rotation is part of the combination of movements that contribute to an ACL injury, not having the requisite mobility is a risk factor. If the body doesn’t have certain available ranges of motion, then the brain and central nervous system are not able to prevent going into those said ranges of motion. Therefore, if someone doesn’t have adequate hip internal rotation, then the body has no way to prevent that motion from occurring.
VandenBerg et al. in Arthroscopy: The Journal of Arthroscopic & Related Surgery that “risk of ACL injury is associated with restricted hip IR, and as hip IR increases, the odds of having an ACL tear decreases.”
Hip External Rotation
Hip external rotation is important because avoidance of a knee valgus position is necessary to avoid injury to the ACL. Having adequate hip external range of motion will allow the athlete to be able to get into an athletic position to avoid that valgus position.
Learn How to Land
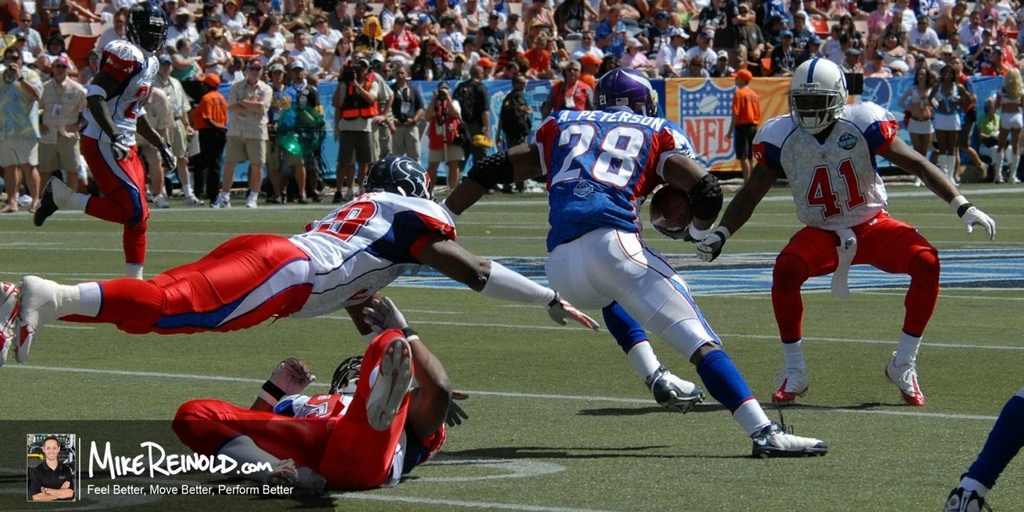
You watch any NFL or NBA game and guys are jumping to catch a ball to to tap in a rebound for 2 points. Most injuries to the ACL don’t occur on the jumping portion as it does on the landing portion.
When athletes have to land from a jump, the body has to absorb 7-10x their body-weight in forces from the ground. If joints aren’t in an ideal position to absorb and adapt to stress, injuries can happen.
Therefore, we need to assess athletes in their landing patterns and mechanics to make sure their body is resilient and capable to land properly.
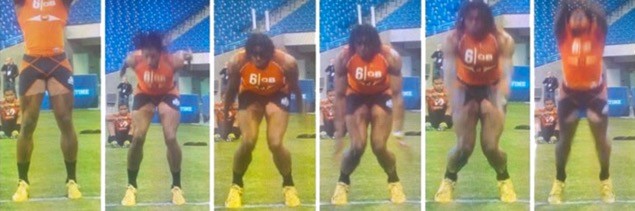
Step Down Test
The Step Down Test is a simple way to determine an athlete’s predisposition to absorbing eccentric stress. Ideally, we like to see the pelvis, hip, knee, and ankle remain in a line during descent.
If someone steps down and the femur internally rotates and the knee goes into valgus collapse, this is something that needs to be rectified.
If you want to use a more quantitative analysis of landing mechanics and skill as compared to the contralateral limb, then here are 3 tests that can help with that.
Single Leg Hop for Distance
Key Points:
- Instruct the athlete to jump as far as then can and land on 1 leg.
- They must stick the landing without hopping around or using their leg/arm for balance.
- Perform 2 trials. Measure each jump, take the average of the 2 trials, then repeat on the opposite leg.
Triple Hop for Distance
Key Points:
- Instruct the athlete to jump as far as they can, land on 1 leg, and continue for 2 more hops, sticking the 3rd landing
- They must stick the landing without hopping around or using their leg/arm for balance.
- Perform 2 trials. Measure each jump, take the average, then repeat on the opposite leg.
Crossover Hop for Distance
Key Points:
- Instruct the athlete to jump as far as they can, land on 1 leg, and continue for 2 more hops, sticking the 3rd landing while crossing over a tape line on the floor with each jump.
- They must stick the landing without hopping around or using their leg/arm for balance.
- Perform 2 trials. Measure each jump, find the average, then repeat on the opposite leg.
Now that you have the average for all 3 jumps, we need to determine if the difference between the two limbs is significant. According to Adams in the Journal of Orthopaedic and Sports Physical Therapy, “limb symmetry indexes of 90% have previously been suggested as the milestone for determining normal limb symmetry in quadriceps strength and functional testing.”
According to Phil Plisky, one of the developers of the Y-Balance Test, he advocates that the athlete’s reconstructed lower extremity be within 95% on the non-involved leg.
To determine if distances hopped are significant, the involved limb must be within 90-95% of the non-involved side. If it is less than 90%, then that athlete is at risk for future knee injury.
Using a regimen consisting of single leg plyometrics in the sagittal, frontal, and transverse planes as well as single leg exercises that focus on power development can help to improve any major deficits.
Achieve Symmetry
If an athlete presents with a gross asymmetry, their risk for injury can increase 3-17x. Besides using the Hop Tests, one way to assess gross asymmetry is also using the Y-Balance Test.
The Y-Balance Test consists of 3 lower and upper body movements. For the sake of this post, we will be focusing on the lower body. The movements consist of:
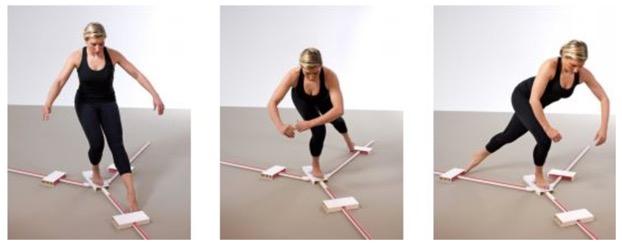
If there is greater than a 4 cm difference right vs left on the anterior reach (1st picture), this is considered a risk factor for a lower extremity injury.
Smith, Chimera, and Warren found in Medicine and Science in Sports & Exercise that “ANT (anterior) asymmetry >4 cm was associated with increased risk of noncontact injury.”
If there is greater than a 6 cm difference right vs left on the posteromedial or posterolateral reaches, pictures 2 and 3, then this is considered a risk factor for a lower extremity injury.
Asymmetry is a normal thing. Everyone from elite level athletes to the average joe has natural asymmetries right vs left. Some asymmetries may not change and some asymmetries may make someone the elite level athlete that they are. Having a relative asymmetry right vs left is ok, but having a gross asymmetry is not.
Enhance Core Stability
The core musculature is responsible for providing a stable base for the pelvis, hips, knees, ankles, etc. to function off of in life and in sport. If a stable base is not provided, then it can create instability and injury further down or up the kinetic chain.
Decreased core stability can cause:
- Pelvic Drop
- Femoral Internal Rotation
- Knee Valgus
- Tibial External Rotation
- Subtalar Excessive Pronation
All these movements are associated with injuries of the ACL. By stabilizing proximally and providing a stable base for all of the aforementioned areas to work off of, this can decrease the risk for injury.
In order to test for core stability, the Trunk Stability Push-Up (TSPU) by Functional Movement is a good test.
This is a great test to determine if someone can maintain a neutral spine while performing a push-up, but also to determine if they have a base level of core stability to maintain a certain trunk position during life/sport.
If someone cannot maintain a specific trunk position, this doesn’t mean that they have a “weak core.” or weak upper extremities. It means that the athlete doesn’t have the capability to stabilize their core proximally in order to exude force distally.
Learn How to Decelerate
Most athletes are fast or at least quick on their feet. The great athletes can speed up and slow down better than anyone. One common risk factor we see with ACL injuries is the inability or subpar ability to be able to decelerate.
What this means is that if someone is going to stop or change direction, they need to have the necessary skills to control their body in space when going from accelerating, to decelerating, and then back to accelerating again.
All fast cars are fast! All really fast cars have great brakes!
In order to assess an athlete’s ability to decelerate, observe how the do with change of direction drills. For example, movements such as:
Sprint/Backpedal w/ Redirection
Lateral Shuffles w/ Redirection
Sprint with 45 Degree Cut
Sprint with 90 Degree Cut
Backpedal, Stop, to 90 Degree Sprint
Backpedal, Stop, to 45 Degree Sprint
All of these various movements test an athlete’s ability to accelerate, decelerate and change directions in all planes of movement. A coach, personal trainer, or physical therapist should be present to provide the athlete with the redirection component. This makes it more random and unpredictable to make sure the athlete can react and move appropriately.
While observing these various change of direction movements, observe the mechanics of the pelvis and lower extremity.
Does the pelvis and hip/knee stay in a relative stable and neutral position when decelerating and stopping?
Does the pelvis and hip/knee go into a valgus collapse during decelerating, stopping, and accelerating phases of movement? Compare these right versus left lower extremities.
If you are having trouble observing these things with the naked eye, film it! There are apps such as DartFish or Hudl that you can download to film athletes and then you can watch it in slow motion to observe any differences side to side.
If differences are seen in right and left comparison, then work on change of direction drills. When first starting off, start the athlete at ½ or ¼ speed so that they can work on their deceleration, stopping, and accelerating mechanics.
We don’t necessarily want to bombard the athlete with too much information about biomechanics of the lower extremity, but having a basic discussion with them and showing them how they currently move and how you would want them to move safely and more efficiently is ideal.
Then once, then can master ¼ or ½ speed, then increase the speed of the drills until you are working at full speed on both sides. There are a multitude of drills out there to work on acceleration, deceleration, stopping, and change of direction. Make sure start with the sagittal plane, and then progress into the frontal and transverse planes.
If you can’t master the sagittal plane, then the frontal and transverse planes will be much more challenging.
Assessing mobility, landing mechanics, relative lower extremity symmetry, core stability, and acceleration/deceleration can all help to improve an athlete’s performance as well as decrease their risk for an ACL injury.
About the Author
 Andrew Millett is a Boston-based physical therapist in the field of orthopedic and sports medicine physical therapy. He helps to bridge the gap between physical therapy and strength and conditioning. Visit his website at AndrewMillettPT.com.